Building ChatGPT apps with OpenAI Apps SDK and Node.js: reading tool output and saving on ChatGPT tokens
Introduction
In the previous chapter we've covered how to build a very simple ChatGPT app with a basic UI. Back then we looked into the basic building blocks of a ChatGPT app.
In this post we'll look into something more intersting.
Language learning app inside ChatGPT
More specifically, we'll write an app that generates a dialogue in Italian and calls ElevenLabs to create an audio of a generated dialogue.
From the technical point of view we'll learn
- How to pass an MCP tool output to the UI
- How to read it there
- And some other goodies
ChatGPT apps let you save money on tokens
Yes, indeed! But how?
Imagine we were building the same functionality as a standalone web application. Roughly it would the flow would be like this:
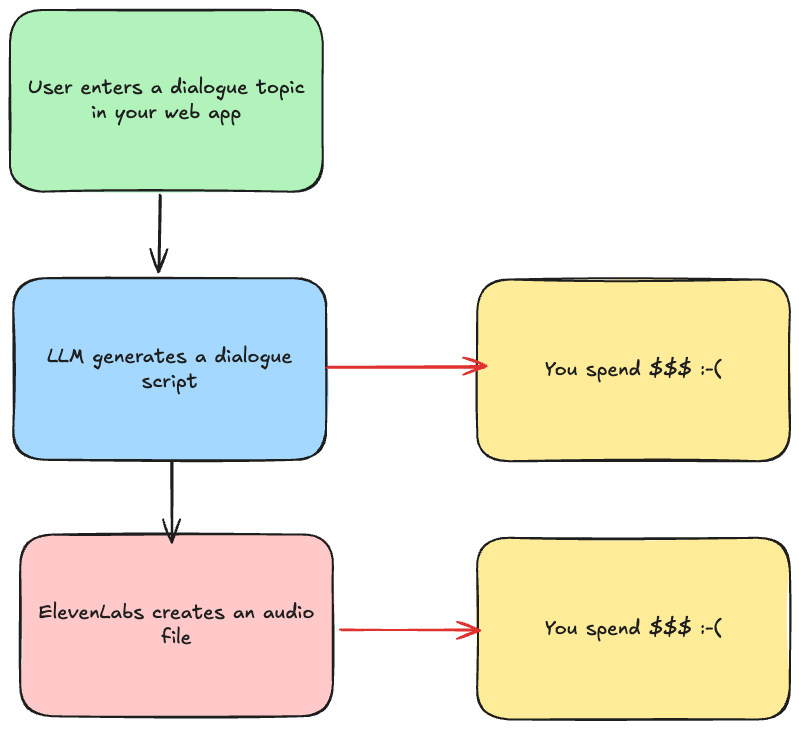
Both LLM and ElevenLabs would require you to spend money. Of course, you can self host an open source model, but then you need to build all the inference infrastructure around it.
With ChatGPT apps and MCPs in general you don't need to call an LLM. LLM calls you!
Instead of writing a prompt inside your app, you need to provide a good description of the input to an MCP tool and an LLM and an MCP client will take care of the rest!
So the flow becomes:
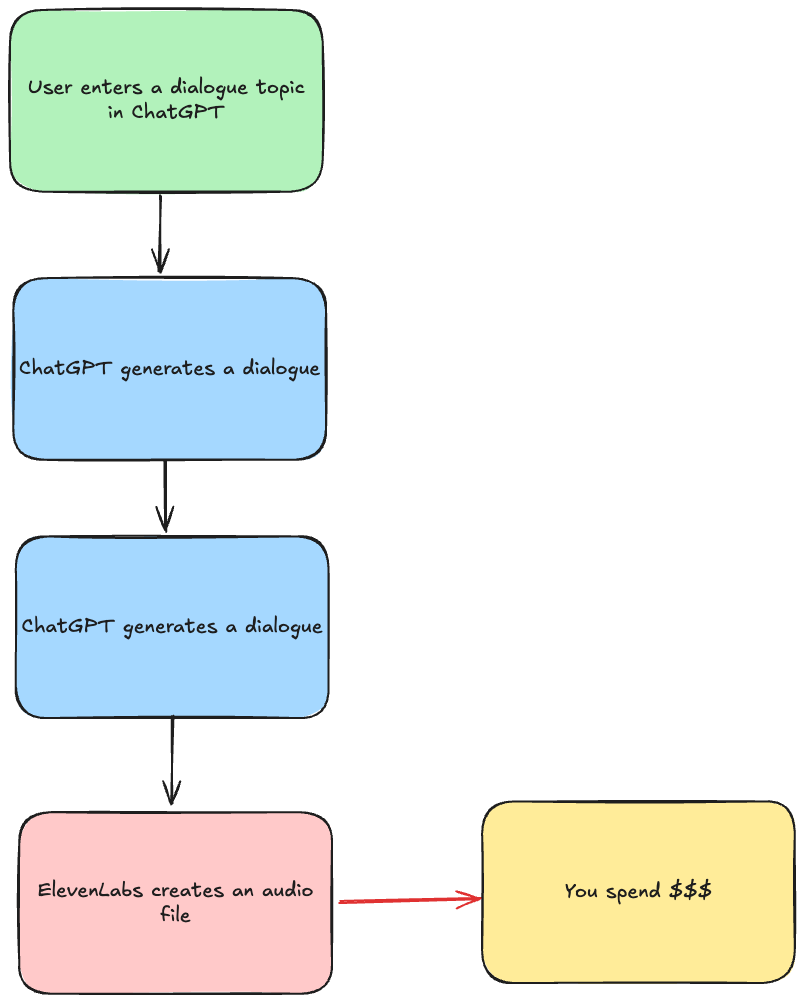
We, as an app developer, don't need to pay for an LLM anymore. The only thing we need to pay for is ElevenLabs!
Let's start builiding!
Input first
The input to our MCP tool is a dialogue.
And what is a dialogue? It's a conversation between two or more people.
For simplicity, let's narrow it down to two people.
When listening to conversations in foreign languages it helps when people speak with different voices. So the best way to ensure that voices are easy to distinguish is to a woman and man talking to each other.
So if we can model a JSON of a dialogue, it would be something like:
{
  "dialogue": [
    {
      "personType": "adult-female",
      "personName": "Maria",
      "text": "Hi, Lorenzo! How are you?"
    },
    {
      "personType": "adult-male",
      "personName": "Lorenzo",
      "text": "Hi, I'm great! And what about you?"
    }
  ]
}
So in terms of the input of our MCP tool it becomes this schema:
server.registerTool(
  "generate-italian-dialogue",
  {
    title: "Generate Italian dialogue",
    description: "Generates Italian dialogue",
    inputSchema: {
      dialogue: z
        .array(
          z.object({
            personType: z
              .enum(["adult-male", "adult-female"])
              .describe("The type of the person (adult-male or adult-female)"),
            personName: z.string().describe("The name of the person"),
            text: z.string().describe("What that person says in the dialogue"),
          })
        )
        .describe("Dialogue to generates"),
    },
    _meta: {
      // we'll add UI templates here
    },
  },
  async ({ dialogue }) => {
    // we'll add the code here
  }
);
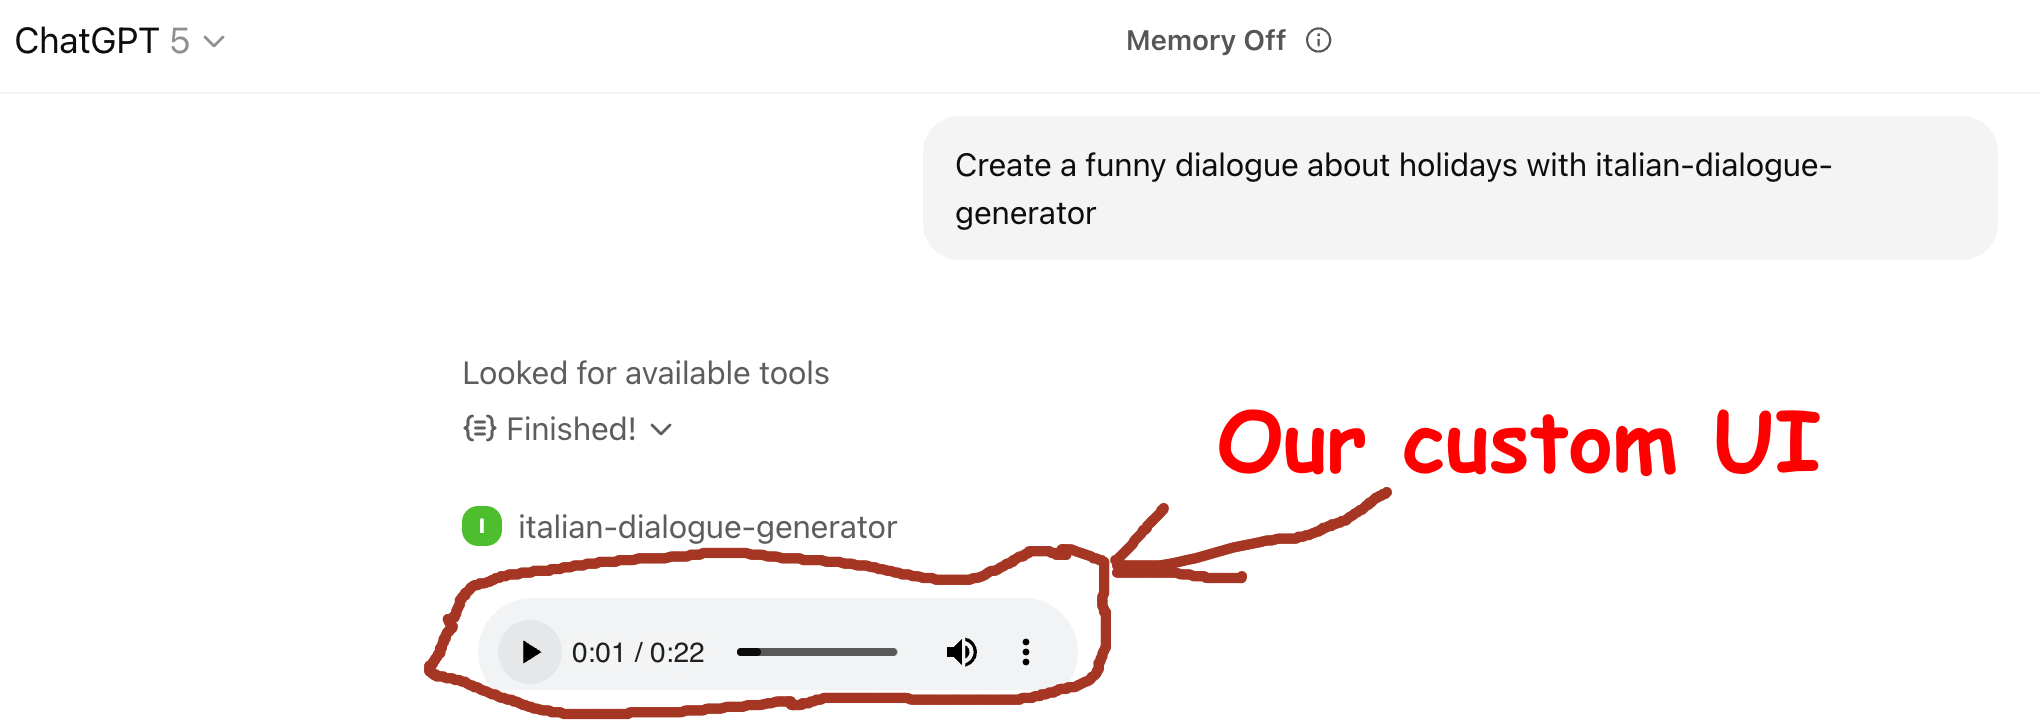
You can actually already add this app to ChatGPT and see that it generates a dialogue in Italian if you ask it something like:
Generate a dialogue about going on holiday using [italian-dialogue-generator]
[italian-dialogue-generator] is the name of the app you give to ChatGPT when adding it. Unfortunately, ChatGPT is still not as good as Claude in figuring out when to call an MCP tool. So it requies a bit more prompting.
Calling ElevenLabs
ElevenLabs is a fantastic voice AI platform. It's a got a great text-to-speech functionality that supports multiple languages and a great array of voices. More importantly, for us it's got the textToDialogue() function in its SDK.
So our MCP tools becomes:
server.registerTool(
  "generate-italian-dialogue",
  {
    title: "Generate Italian dialogue",
    description: "Generates Italian dialogue",
    inputSchema: {
      // we've covered it above
    },
    _meta: {
      // we'll come back to this
    },
  },
  async ({ dialogue }) => {
    const elevenlabs = new ElevenLabsClient({
      // using dotnenv
      apiKey: process.env.ELEVENLABS_API_KEY,
    });

    const audio = await elevenlabs.textToDialogue.convert({
      inputs: dialogue.map((line) => ({
        text: line.text,
        voiceId: VOICES[line.personType as keyof typeof VOICES],
      })),
    });
  }
);
Building UI & wiring UI and MCP tool output
It's time to build a UI. It'll be a simple audio player using the <audio /> tag.
But what will the src attribute point to?
It has to point to the location of the generated audio file. We will return that URL from the MCP tool and read it from the UI.
In the previous chapter we've covered how you can read the MCP tool input using window.openai.toolInput. There is also window.openai.toolOutput. It corresponds to the structuredContent attribute of the result of the MCP tool.
So if we have something like this in the MCP tool:
return {
  content: [
    {
      type: "text",
      text: "Audio generated",
    },
  ],
  structuredContent: {
    audioUrl: `some-audio.mp3,
  },
};
Then window.output.toolOutput will be:
{
  "audioUrl": "some-audio.mp3"
}
Sounds cool! So what we need to do is just save a audio stream from ElevenLabs and return its URL:
const audio = await elevenlabs.textToDialogue.convert({
    inputs: dialogue.map((line) => ({
      text: line.text,
      voiceId: VOICES[line.personType as keyof typeof VOICES],
    })),
  });

  // Convert ReadableStream to Buffer
  const reader = audio.getReader();
  const chunks: Uint8Array[] = [];

  while (true) {
    const { done, value } = await reader.read();
    if (done) break;
    chunks.push(value);
  }

  const audioBuffer = Buffer.concat(chunks);

  fs.writeFileSync("./dialogue-audio/audio.mp3", audioBuffer);

  return {
    content: [
      {
        type: "text",
        text: "Audio generated",
      },
    ],
    structuredContent: {
      audioUrl: `https://${process.env.PUBLIC_URL}/dialogue-audio/audio.mp3`,
    },
  };
}
That also assumes that we serve it via express.static():
app.use("/dialogue-audio", express.static("dialogue-audio"));
ChatGPT is rendered before the tool finishes
But... if try to read window.openai.toolOutput in the UI, say like this:
<script>
    document.addEventListener("DOMContentLoaded" () => {
      console.log(window.openai.toolOutput);
  });
</script>
It won't be defined. That's because the UI is rendered before the tool finishes.
Luckily, there's an event openai:set_globals which we can listen to with window.addEventListener. It's fired every time there's a change - say, an MCP started running or finished. So window.openai.toolOutput won't be defined every single time the event fires, but it will eventually.
So in total we should write something like this:
server.registerResource(
  "audio-player",
  "ui://widget/audio-player.html",
  {},
  () => ({
    contents: [
      {
        uri: "ui://widget/audio-player.html",
        mimeType: "text/html+skybridge",
        text: `
            <script>
              window.addEventListener("openai:set_globals", () => {
                if (window.openai.toolOutput && window.openai.toolOutput.audioUrl) {
                    const audioElement = document.createElement("audio");
                    audioElement.controls = true;
                    audioElement.autoplay = true;
                    audioElement.src = window.openai.toolOutput.audioUrl;
                    const audioPlayerPlaceholder = document.getElementById("audio-player-placeholder");
                    audioPlayerPlaceholder.appendChild(audioElement);

                    const loadingMessage = document.getElementById("loading-message");
                    loadingMessage.style.display = "none";
                }
              });
            </script>

            <div>
              <div id="loading-message">Loading...</div>
              <div id="audio-player-placeholder"></div>
            </div>`,
      },
    ],
  })
);
And finally connect it with the MCP tool by adding this _meta attribute:
_meta: {
  // this has to match the uri of the resource we registered above
  "openai/outputTemplate": "ui://widget/audio-player.html",
  // loading message
  "openai/toolInvocation/invoking": "Generating dialogue audio",
  // loaded message
  "openai/toolInvocation/invoked": "Finished!",
}
Full source code
What we have learnt
- How to pass the output of an MCP tool to an HTML template
- How to read it in the UI - remember
window.openai.toolOutputwon't be availale straight away. You have to listen toopenaievents - And finally... that you can save on LLM tokens by building apps inside ChatGPT or MCPs in general
Future chapters
- In the next chapters we'll cover how to build interactive UIs in ChatGPT
- And how to embed React in it
The opinions expressed herein are my own personal opinions and do not represent my employer's view in any way. My personal thoughts tend to change, hence the articles in this blog might not provide an accurate reflection of my present standpoint.
© Mike Borozdin